How to Remove Ring Camera: A Complete How-To
Learn how to remove a Ring camera safely and efficiently. This guide covers mounting types, tools, step-by-step removal, post-removal care, and common questions to help you protect your home security setup.

This guide explains how to remove ring camera safely and efficiently. Start by powering down the unit, then gather the right tools, unscrew mounting screws, and disconnect wiring if present. Handle the camera gently to avoid damage to walls or the device, and store hardware for reuse.
How to Remove Ring Camera: Mounting Types and Considerations
When learning how to remove ring camera, the approach depends on how the device is mounted. Ring doorbells and cameras can be installed with screws, adhesive mounts, or a combination. The removal process is easier if you know the mounting type beforehand. In this section, we outline common configurations and what to expect during removal, so you can plan your workspace and protect walls and wiring. This guidance aligns with Best Camera Tips practices to ensure a safe, non-destructive removal while keeping hardware organized and ready for future reuse.
Safety First: Power Down, Lockout, and Workspace
Safety should always come first when removing a Ring camera. If the unit is wired, turn off power at the breaker or disconnect the doorbell transformer before touching any wiring. Use a sturdy ladder or step stool on a flat surface, and wear protective gloves to avoid cuts from sharp edges or metal mounting brackets. Clear the area beneath the mounting site to prevent accidents if tools slip. Testing the power-off state with a simple voltage tester is a prudent precaution when in doubt. Remember, a calm, methodical approach reduces the risk of damage to your home or the device.
Tools and Materials You'll Need
Preparation is key. Gather the right tools before you start so you don’t have to repeatedly climb up and down. A magnetized Philips head screwdriver (typically #2) is essential for most Ring mounts. Have a small bowl or magnetic tray to keep screws secure. If your camera uses Torx or hex screws, include the appropriate driver bits. A stable ladder, soft cloth, and optional wire labels help keep work tidy and safe. If necessary for future use, have spare mounting screws and zip ties for cable management. Finally, keep a dust-free cloth handy to wipe down surfaces after removal.
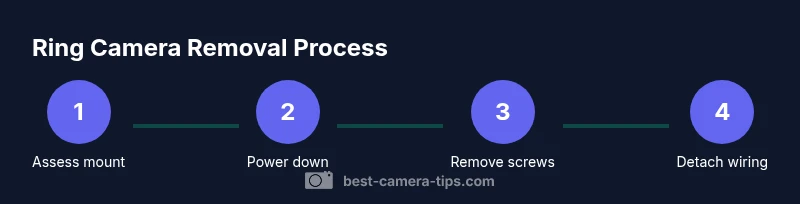
Step-by-Step Removal Overview
Removal can be broken down into a few clear phases: identify mount type, power down, loosen screws, detach the camera from the mount, disconnect any wiring with care, and address the mounting surface. Each phase has safety checks and tool requirements. This overview sets expectations and helps you plan the actual steps with confidence. The key is to stay organized, keep track of all hardware, and work slowly to avoid damaging the wall, doorframe, or camera.
Removing the Camera from a Screwed Mount
If your Ring camera is fixed with screws, start by ensuring power is off and your ladder is stable. Use the appropriate screwdriver to loosen and remove each mounting screw. Keep the screws in a magnetized tray to avoid losing them. Once all screws are removed, gently lift the camera away from the bracket, supporting it with both hands to prevent a fall. If the camera sits in a bracket with a slot mechanism, lift straight out to avoid jamming. After removal, inspect the bracket for any damage and set aside the hardware for reuse or disposal.
Detaching Wiring Safely (If Wired)
Wired Ring cameras require careful handling. After confirming power is off, disconnect the wiring at the terminal block or plug, depending on the model. If you cannot fully disengage the cable, label the wires for future reinstallations and gently loosen any clamps preventing movement. Do not pull on the wires themselves; instead, grip the connector or the wall plate. Store connectors in a labeled bag and ensure the exposed conductors are capped with electrical tape to prevent accidental contact.
Dealing with Adhesive Mounts or Tape Mounts
Adhesive mounts are common on some Ring cameras, especially compact indoor models. If you encounter adhesive, use a product like a heat gun or hair dryer to loosen the bond gently before prying. Avoid harsh tools that could crack the camera or surface. Work slowly and evenly around the mount to minimize wall damage. For stubborn adhesive, apply a small amount of isopropyl alcohol and let it soak before peeling. Always wipe away residue with a microfiber cloth to prevent staining the wall.
Aftercare: Wall Repair, Cable Management, and Storage
Post-removal care helps maintain home aesthetics and prepares for potential reinstallation. Fill any holes with spackle, then sand smooth once dry. Repaint if necessary to blend with the wall color. Organize and label any screws or mounting brackets you plan to reuse. Use cable management tools to keep any wires tidy, and consider a discreet patch panel or wall plate if you intend to conceal wiring. Finally, store the camera in its original box or a protective case to prevent dust accumulation.
When to Call a Pro and Safety Considerations
If you encounter framing issues, live electrical wiring beyond your comfort zone, or the device is part of a larger security system, professionals can help avoid damage and ensure proper reinstallation. If the camera is mounted on brick, stone, or weathered surfaces, special tools or methods may be required. In any case, prioritize safety over speed; incorrect removal can lead to wall damage, personal injury, or security gaps.
Tools & Materials
- Screwdriver (Phillips #2)(Needed to remove mounting screws. Use a magnetized tip to prevent losing screws.)
- Torx/Hex driver (model-dependent)(Have the appropriate bit on hand in case your model uses alternate fasteners.)
- Ladder or stable step stool(Ensure a safe, level base and avoid overreaching.)
- Safety gloves(Protect hands from sharp edges and rough surfaces.)
- Soft cloth or microfiber(Protects the camera and wall surfaces during removal.)
- Replacement screws/anchors(Keep on hand if you plan to re mount at the same or new location.)
- Cable management supplies (zip ties, clips)(Tidy up any exposed wiring for a clean appearance.)
- Voltage tester(Useful for confirming power is fully off when wiring is suspected.)
Steps
Estimated time: 15-25 minutes
- 1
Identify mounting type and power state
Examine how the Ring camera is mounted (screws, adhesive, or a hybrid) and verify that power is off. This sets your plan and prevents accidental shocks or damage.
Tip: If you’re unsure about wiring, start by turning off the main power at the breaker before touching any cables. - 2
Prepare your workspace
Set up a stable ladder and clear the area under the mounting point. Have a tray ready for screws and a cloth for wiping surfaces.
Tip: Keep a flashlight handy in case the mounting cavity is dark or recessed. - 3
Loosen and remove screws
Using the correct screwdriver, loosen each mounting screw and place them in a magnetized tray. Do not force any fasteners; if a screw is stuck, reassess tool fit or mounting type.
Tip: Support the camera with one hand as you remove the last screw to prevent a fall. - 4
Detach the camera from the mount
Carefully lift the camera away from the bracket, keeping a firm grip to avoid drops. If it sits in a hinged or snap-fit mount, disengage slowly.
Tip: Place the camera on a soft surface to avoid scratches. - 5
Disconnect wiring (if present)
If there are wires, disconnect at the terminal or connector. Label each wire and tape exposed conductors to prevent contact.
Tip: Power should remain off throughout this step; never rely on a partial power-down. - 6
Remove adhesive mounts or tape
Gently loosen adhesive with heat or a plastic tool. Avoid metal tools that could scratch the wall or camera.
Tip: Work gradually around the edge to reduce wall damage. - 7
Inspect the mounting surface
Check for holes, residue, or wall damage. Clean the surface and decide if you want to patch or repaint before reinstalling.
Tip: If holes exist, fill and sand before repainting for a seamless result. - 8
Store hardware securely
Group screws and brackets by location or project for future reuse. Keep everything in labeled containers.
Tip: Take photos of the installation for reference if you plan to reinstall later. - 9
Plan for reinstallation or removal
Decide whether you’ll reuse the same mount or relocate to a new spot, ensuring proper wall support and clearance.
Tip: If relocating, prepare a new mounting surface and hardware before starting the removal process.
Common Questions
Do I need to unplug power before removing the Ring camera?
Yes. If the camera is wired, turn off power at the breaker or disconnect the transformer before touching any wiring.
Yes. Make sure the power is off at the breaker before you start removing wiring.
Will removing the camera void the warranty?
Removal itself typically does not void the warranty unless you damage the device or wiring. Always follow the manufacturer’s guidelines and keep receipts or model information for support.
Removal doesn’t usually void warranty unless you damage the device; keep your model information handy for support.
What if the camera is attached with adhesive rather than screws?
If adhesive is used, apply heat to loosen the bond and work slowly to prevent wall damage. For stubborn adhesive, use isopropyl alcohol and a plastic tool.
If it’s glued on, warm it up and peel slowly to protect the wall.
How should I handle wiring after removal?
Label any wires, cap exposed conductors, and store connectors safely. If you plan to reinstall, organize wires and ensure proper routing to avoid future issues.
Label and cap wires, then store everything safely for reinstallation.
Can I reuse the original mounting screws?
If the screws are not stripped or damaged, you can reuse them. If you’re unsure, replace with new screws of the same size to ensure a secure mount.
Yes, reuse intact screws or replace with the same size for security.
Watch Video
The Essentials
- Power down before touching any wiring.
- Use the correct screwdriver to avoid stripping screws.
- Keep hardware organized for reuse.
- Patch and manage cables for a clean wall.