Repair Camera: A Practical How-To Guide for Beginners
A comprehensive, expert-led guide from Best Camera Tips on diagnosing and repairing common camera issues, using safe tools and step-by-step workflows to extend your gear's life.

Learn how to safely diagnose and repair common camera issues, from stuck shutters to focus motor glitches. This guide covers essential tools, safe disassembly basics, and practical repair steps you can perform at home, plus when to stop and seek professional service. By following these steps, you’ll extend your camera’s life and save repair costs.
Why repair camera matters for aspiring photographers
Repairing a camera can extend its life, protect your investment, and help you maintain image quality over time. When you’re learning the craft, reliable gear is essential, and avoiding unnecessary purchases is a smart move. According to Best Camera Tips, basic maintenance and careful troubleshooting can reduce downtime and keep you shooting. This section explains why keeping a camera in working order is a core skill for any serious hobbyist or student.
In practice, many issues—like a sticky shutter, misbehaving autofocus, or unpredictable exposure—are solvable with careful inspection and safe, documented steps. You’ll gain confidence by understanding how the components interact, including optics, sensors, and the mechanical linkages. When you repair a camera yourself, you also learn to recognize when a problem goes beyond DIY scope and warrants professional help.
The goal here is not to promise permanent fixes for every model, but to empower you with a methodical approach, proper safety, and a decision framework to decide when to repair or when to replace.
Safety first and scope of repair
Safety should guide every repair project. This means powering down the camera, removing the battery and memory card, and working in a clean, static-free area. Many components inside a camera can be sensitive to electrostatic discharge, moisture, and dust, so use a grounded workspace and anti-static tools where possible. The scope of repair depends on your skill level, the camera model, and the availability of replacement parts. If you encounter a high-voltage circuit, a damaged main board, or a compromised sensor, stop and seek professional service. This section covers safety basics, common risk areas, and a realistic assessment checklist you can follow before you begin disassembly.
Best Camera Tips emphasizes a measured approach: document every step, verify compatibility of parts, and never force connectors. When in doubt, consult the camera’s service manual or manufacturer guidelines to avoid irreversible damage.
Planning your repair workflow: assess, source parts, and document
Before you touch any screws, plan your workflow. Start by identifying the problem through careful testing and visual inspection, then determine which parts are involved. Create a list of needed tools and replacement components, and check your warranty status—some cameras require professional service for certain issues to avoid voiding coverage. Document each step with photos or short videos so you can reverse any action if something goes wrong. This preparation reduces guesswork and helps you trace steps if the repair turns out more complex than expected.
In this phase, organize a small parts tray, label screws by location, and have a clean working surface. You’ll also want to establish a test routine to verify functionality after reassembly, including power-on checks and a few trial shots to confirm exposure, focus, and white balance are behaving as expected.
Common repair scenarios and approaches
There are a handful of repair scenarios that home technicians encounter most often. For a sticky shutter, you may need to inspect the shutter curtains and the associated actuation mechanism, ensuring no lint or adhesive residue is interfering with motion. Autofocus errors can stem from misaligned lens data or dirty sensor surfaces, requiring careful cleaning and recalibration of focus motors. Sensor issues (hot pixels, dust, or dead zones) should be assessed with controlled test shots and, if needed, sensor cleaning procedures using manufacturer-approved methods. In all cases, reseating connectors, re-taping cables, and safeguarding seals are crucial to prevent new symptoms after reassembly. This section unpacks typical symptoms, likely culprits, and how to address them safely without compromising other systems.
Remember: some problems require specialized tools or part replacement that only a service center can perform reliably. The goal is to balance DIY learning with prudent limits, and to preserve your camera’s integrity for future use.
Authority sources and best practices
To ensure you’re following established safety and repair standards, consult reliable sources. From an educational perspective, refer to general electronics safety guidelines and camera maintenance best practices. This block includes a curated list of credible resources and guidelines to support your repair journey:
- Authority guidance on safety and electronics handling: OSHA and related safety resources
- Technical standards and best-practice references from reputable science and engineering sites
- Reputable overview materials from major publications on electronics repair ethics and care
These sources are included to help you verify procedures and to reinforce safety when performing any hands-on repair work. The goal is to support practical learning while keeping you and your gear safe.
Maintenance and preventive care to extend life
Once you’ve completed a repair, a routine preventive care plan helps you avoid recurring issues. Schedule periodic inspections of latches, seals, and connectors; clean the exterior with a soft microfiber cloth; and protect the sensor and optics from dust and moisture. Store the camera in a cool, dry place, use a protective case, and keep firmware up to date where possible. Routine calibration checks, gentle lens changes, and careful handling reduce the risk of misalignment or wear over time. This long-term mindset is a practical way to maximize the return on your repair investment and keep you shooting with confidence.
By adopting a proactive maintenance routine, you’ll cultivate habits that extend gear life and reduce downtime, which is especially valuable for students and hobbyists who rely on reliable equipment for learning and practice.
Tools & Materials
- ESD-safe screwdriver set(Precision bits and magnetic tip; sizes: 0.8-1.5 mm depending on model)
- Plastic opening tool (spudger)(Non-metal for prying; prevents surface scratches)
- Precision tweezers(Fine tips; antistatic if possible)
- Microfiber cleaning cloth(Lint-free; use with manufacturer-approved solvents)
- Isopropyl alcohol (99%)(For sensor and contact cleaning only; ensure no residue)
- Anti-static wrist strap(Keeps you grounded during sensitive handling)
- Small parts tray / labeled containers(Organize screws and tiny components by location)
- Magnifying tool or loupe(Helpful for inspecting tiny connectors)
- Replacement parts kit (where applicable)(Shutter assembly, ribbon cables, gaskets; only if you’ve diagnosed a faulty part)
- Lint-free wipes and lens-safe cleaner(For exterior surfaces and optics)
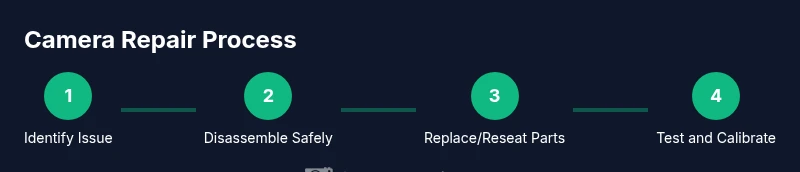
Steps
Estimated time: 3-6 hours
- 1
Power down and prep workspace
Power off the camera and remove the battery and memory card. Place the camera on a clean, static-free surface and organize tools. This prepares you for safe opening and minimizes risk of accidental damage.
Tip: Keep screws in labeled containers as you remove them to map back to their mounting points. - 2
Remove outer shell screws and access internals
Use the appropriate screwdriver to remove screws from the housing. Keep track of screw length and location. Gently pry the shell apart with a plastic tool, avoiding metal blades that could scratch or short components.
Tip: Slide the cover away in small, even motions to avoid snapping clips. - 3
Document layout and photograph connectors
Before disconnecting any cables, photograph the internal layout and connector orientation. Label cables with micro tape and arrows, and test-fit their positions on reassembly. This step reduces the risk of misconnected ribbons.
Tip: Use a magnifier for tiny connectors and take a short video of socket insertions. - 4
Diagnose the fault area with a focused inspection
Inspect the shutter assembly, AF module, sensor edge, and main board for obvious signs of wear, dust, or damage. Gently move parts to observe any snagging or resistance. Note any signs of liquid ingress or corrosion.
Tip: If you see corrosion, do not attempt further repairs and seek professional help. - 5
Remove and inspect the faulty component
Carefully disconnect and remove the suspected component using non-magnetic tools. Inspect connectors and cables for bent pins, torn ribbon cables, or debris. Clean components with appropriate solvents or dry air as needed.
Tip: Take care not to force connectors; excessive force can bend pins or tear ribbons. - 6
Replace or reseat the component and resecure connections
Install the replacement part or reseat the existing component, then reattach all connectors in the correct orientation. Replace any gaskets or seals if they show wear. Reassemble the assembly in reverse order of disassembly.
Tip: Double-check cable routing to avoid pinching during reassembly. - 7
Reassemble the body and check seals
Close the camera housing, reinstall screws in their original pattern, and ensure seals are intact. Verify door latches and battery door function properly. A poor seal could allow dust or moisture to enter during future use.
Tip: If seals look compressed or damaged, consider replacing them to prevent future ingress. - 8
Test power, function, and calibration
Power the camera on and run a basic test: autofocus, shutter, exposure compensation, and white balance. Take a few test shots in different modes to verify consistency. If faults persist, review the earlier steps or consult a service technician.
Tip: Log results and compare to baseline test shots taken before disassembly.
Common Questions
Can I repair a camera at home, and when should I stop?
Yes for simple, non-destructive issues with proper safety and documentation. If you encounter high-voltage components, suspected sensor damage, or delicate ribbon cables, stop and consider professional service to avoid irreparable harm.
You can try simple fixes at home if you’re careful, but stop if you hit high-voltage parts or suspect sensor damage.
What basic tools do I need to start a repair?
A good quality precision screwdriver set, plastic opening tools, anti-static wrist strap, tweezers, microfiber cloth, and a labeled screw tray are essential for most repair tasks. Start with non-destructive checks before advancing to component removal.
Start with a screwdriver, plastic tools, anti-static strap, tweezers, and a labeled tray.
Which issues are typically DIY-friendly?
Dust removal, exterior cleaning, reseating loose connectors, and minor firmware resets are often doable for beginners. More complex issues like shutter mechanics or sensor replacement generally require professional service.
Dust and loose connections are often DIY-friendly; major mechanical fixes usually need pros.
Is it safe to repair battery connectors myself?
Battery connectors can pose risk if mismanaged. Avoid direct contact with battery chemistry and work in a well-ventilated area. If you see swelling, leaks, or corrosion, discontinue and seek professional help.
Be cautious with battery connectors; stop if you see swelling or leaks.
What signs indicate a repair isn’t worth DIY?
If the fault involves the main board, sensor integrity, or water damage, the cost and risk typically outweigh DIY benefits. In these cases, professional calibration and testing are safer and more reliable.
If you see water damage or a damaged sensor, it’s best to go pro.
How can I prevent future camera problems?
Regular cleaning, proper storage, firmware updates, and gentle handling reduce the likelihood of future issues. Create a simple maintenance checklist and follow it after every shoot.
Keep it clean, store it properly, and update firmware to prevent problems.
Watch Video
The Essentials
- Prepare a safety-first workspace before starting.
- Document every step with photos for accurate reassembly.
- Diagnose methodically; replace only when you’re sure.
- Know when to stop and seek professional help.
- Maintain a preventive care routine to extend life.