Where are camera permissions on iPhone: A practical guide
Learn where camera permissions live on iPhone, how to manage per-app access, and best privacy practices. Step-by-step instructions, troubleshooting tips, and expert guidance for aspiring photographers and home security enthusiasts.

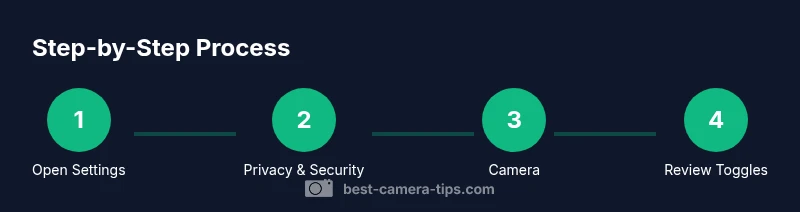
You can locate and control camera permissions on iPhone by going to Settings > Privacy & Security > Camera, then reviewing each app’s access and toggling it on or off. This quick path helps you protect privacy while keeping essential apps functional. If you’re unsure, this guide walks you through the exact steps.
What camera permissions are and why they matter
If you’re asking where are camera permissions on iphone, understanding what they control and why they matter helps you protect privacy while enjoying photography apps. Camera permissions determine which apps can access the camera hardware on your device. When granted, an app can open the camera to take photos or video; when denied, the app cannot access the camera, which can affect core features like scanning documents, video calls, or AR experiences. For photographers and home security enthusiasts, managing these permissions is a balance between convenience and privacy. Best Camera Tips emphasizes reviewing permissions regularly, especially after app updates or iOS upgrades, to ensure you only share access with trusted software. Clear permissions reduce the risk of unwanted data exposure and improve your overall device security, a critical consideration in today’s connected photography and surveillance workflows.
Where camera permissions live in iPhone Settings
On iPhone, camera access is controlled per app under Settings. To locate it, open the Settings app, then navigate to Privacy & Security, and select Camera. You will see a list of apps that have requested camera access, each with a simple on/off toggle. You can turn access on for apps you trust and deny it for others. If you ever miss a prompt or need to revisit a decision, this screen provides a centralized, transparent view of which apps can see your camera. This design aligns with Best Camera Tips’ guidance to give users granular control over their devices while preserving the user experience for essential photography and home security apps.
The per-app permission model explained
Camera permissions on iPhone operate on a per-app basis, unlike some other permissions that may be shared across features. When you grant permission to an app, it can access the camera whenever you use that app, subject to its own in-app prompts and system rules. If you deny access, the app will not be able to launch the camera or capture media. You can switch permissions back on at any time via Settings. This per-app model helps you tailor your privacy without needing to uninstall apps or revoke other permissions.
How to grant camera access to a new app
When you install a new app that uses the camera, you will usually encounter a system prompt asking for permission. Tap Allow to grant access, or Don’t Allow to deny. If you choose not to grant permission initially, you can always enable it later by going to Settings > Privacy & Security > Camera and toggling the new app on. Some apps may request permission to the microphone or Photos as well; grant only what is necessary for the app’s core functions. Regularly testing camera functionality after installation ensures the app behaves as expected.
How to revoke or adjust existing permissions
To revoke or adjust camera access, open Settings > Privacy & Security > Camera. You’ll see a list of apps with their current permission status. Turn off access for any app you no longer trust or need. If you later decide to use the app again, revisit this screen and re-enable its permission. For apps that use camera features in specific contexts (like scanning vs. taking quick photos), you might consider keeping access restricted and re-evaluating after updates. This approach aligns with privacy best practices recommended by Best Camera Tips.
Common prompts and why apps ask for camera access
Many photography, video conferencing, and AR apps require camera access to deliver their core functionality. Some apps may request camera permissions repeatedly if the prompt is dismissed, which can be annoying; enabling the permission is a one-time decision per app. Be mindful that certain features (e.g., social sharing, QR scanning, or level of AR interaction) rely on having camera access. If you ever notice an app behavior that seems to rely on the camera without a permission prompt, revisit your Settings to confirm that access is correctly configured.
Troubleshooting: when permissions don’t seem to apply
If an app denies access but still requests the camera or fails to perform after you’ve granted permission, try these steps. First, close and reopen the app, then test again. If the issue persists, restart the iPhone. If problems continue, reinstall the app or check for an update, as software fixes often address permission edge cases. As a last resort, you can reset privacy settings (Settings > General > Transfer or Reset iPhone > Reset Privacy) to restore default prompts, then grant permissions again. Always back up data before performing resets and verify that you’re installing trusted apps.
Privacy best practices for iPhone camera use
Adopt a privacy-first approach by granting camera access only to apps that truly need it. Prefer prompts that appear during first use and be cautious with apps obtained from unofficial sources. Regularly review the list of apps with camera access and remove any that are no longer needed. Consider also reviewing related permissions like Microphone and Photos, especially for apps that will capture media and store or share it. Keeping your camera access tightly controlled helps protect your images and video from unauthorized use.
Quick checks before sharing camera access with a collaborator
If you’re sharing a device with a collaborator or family member, perform a quick audit: ensure each person’s apps have only the permissions they need, disable auto-sharing features if not required, and remind users to log out of shared accounts when done. For security-conscious setups, consider turning off camera access for apps that aren’t actively used in the moment. Regular reviews, especially after OS or app updates, help maintain a secure photography workflow and protect home surveillance data.
Advanced tips for developers and power users
For developers, test your app’s camera permissions by triggering first-run prompts and ensuring graceful handling when permission is denied. Power users can leverage the iPhone’s Privacy controls to simulate permission prompts or to audit installed apps. If you manage multiple devices for a workflow (e.g., a photography studio or a home security setup), use a consistent policy for granting camera access and document it for team members. Keeping a record of permission decisions helps in audits and privacy reviews.
Tools & Materials
- iPhone or iPad(Any recent model will use Settings to manage camera permissions; path remains consistent across recent iOS versions.)
- Settings app(Used to access Privacy & Security and Camera sections.)
Steps
Estimated time: 10-15 minutes
- 1
Open Settings
Unlock your iPhone and open the Settings app to begin reviewing camera permissions for each installed app.
Tip: If you use a lot of apps, use the Settings search to jump to 'Camera'. - 2
Navigate to Privacy & Security
In Settings, scroll to Privacy & Security, then tap Camera to see which apps currently have access.
Tip: This screen provides a centralized view; you can toggle permissions for each app here. - 3
Review per-app permissions
Look through the list and identify any apps you don’t want to access the camera. Switch them off as needed.
Tip: Turn off access for apps you don’t trust or rarely use the camera with. - 4
Grant access for a new app
Install a new camera-reliant app and grant permission when prompted, or enable it later from the list if desired.
Tip: If you deny at first, you can always enable later from Settings > Privacy & Security > Camera. - 5
Test the app’s camera
Open the app and try to use the camera to confirm permissions behave as expected.
Tip: If the app prompts again, ensure the toggle is turned on for that app. - 6
Troubleshoot if needed
If issues persist, restart your device or reinstall the app; for persistent problems, consider resetting privacy settings.
Tip: Resetting privacy settings resets prompts for all apps—use as a last resort.
Common Questions
Where are camera permissions located on iPhone?
Camera permissions are managed per app. Go to Settings > Privacy & Security > Camera to view and adjust each app's access.
Go to Settings, Privacy & Security, Camera to review per-app access.
Can I grant camera access for all apps at once?
No. iPhone manages camera access per app; you must enable or disable permissions individually for each app.
There isn’t a global on/off for all apps—adjust each app separately.
What happens if I deny camera access?
Denied access prevents the app from using the camera until you re-enable permission in Settings.
If you deny access, the app can’t use the camera until you enable it again.
Will camera permissions affect other iPhone features?
Camera permissions affect only the apps that request camera access. Other device features remain unaffected unless they rely on separate permissions.
Only apps with camera access are affected; other features stay the same.
How do I test camera permission after changing settings?
Open the camera-enabled app and attempt to capture media. If prompted, grant permission or verify the toggle is on.
Open the app and try to use the camera to confirm the setting.
How do I reset all camera permissions?
Go to Settings > General > Transfer or Reset iPhone > Reset Privacy. This restores default prompts for all apps.
Reset privacy settings from General to restore default prompts.
Watch Video
The Essentials
- Review camera permissions per app regularly.
- Grant access only to trusted apps that need it.
- Use the Settings path to revoke or re-enable as needed.
- Test after updates or new app installations.
- Reset privacy settings only as a last resort.