Check Your Camera in Microsoft Teams: Quick Test Guide
Learn how to check if your camera is working on Microsoft Teams with a quick, step-by-step test. Covers permissions, device selection, and cross‑platform checks to troubleshoot camera issues quickly.

How to check if your camera is working on microsoft teams? This guide provides a quick, step-by-step approach to verify permissions, select the right device, and perform a live Teams test call. It covers Windows, macOS, iOS, and Android so you can troubleshoot camera issues across platforms quickly and confidently.
Prerequisites and Setup
Before you begin, confirm you have a device with a working camera (built-in or external), a stable internet connection, and the latest Teams app or a supported browser. Ensure your operating system is up to date, and check that the camera is not currently in use by another application. You will also need to review privacy settings so Teams is allowed to access the camera. Having a backup plan—such as a secondary device or USB webcam—can save time if one path runs into hardware issues. In practice, this pre-check is the difference between a smooth test and a frustrating debugging session. If you follow these prerequisites, you’ll be well-positioned to diagnose common problems quickly and keep meetings moving smoothly across platforms.
Understanding Teams Camera Permissions Across Platforms
Camera permissions vary by platform, and a misconfiguration here is a very common reason Teams can’t show video. On Windows, open Settings > Privacy > Camera and ensure 'Let apps access your camera' is turned on and that Microsoft Teams is included in the list of allowed apps. On macOS, go to System Preferences > Security & Privacy > Privacy > Camera and verify Teams has permission. iOS and Android rely on per-app permissions through the OS settings; make sure Teams has camera permission and that no global privacy setting blocks it. A quick cross-check across all devices helps you isolate whether the issue is platform-specific or device-wide.
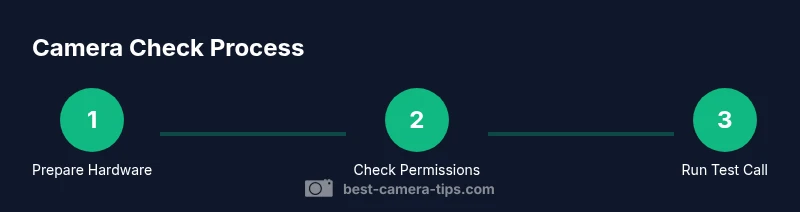
How to Run a Quick Camera Test in Teams
Open Microsoft Teams and navigate to Settings > Devices. In the Camera dropdown, select the camera you want to test. Look for a live preview; if you don’t see one, try switching to another camera or unplugging/replugging external webcams. Then start a quick test call (or use a dedicated test feature if available) to verify the video feed is active. If the preview looks correct but your camera still isn’t visible to others, the problem may be related to permissions or application conflicts rather than the hardware itself.
Troubleshooting Camera Not Detected in Teams
If your camera isn’t detected, first close any other apps that might be using the camera (browser video pages, other video apps). Disconnect and reconnect external cameras, try a different USB port, and reboot your device if necessary. Update your camera drivers or firmware, and ensure your Teams app is up to date. If the problem persists, check for Windows or macOS updates, as OS bugs can temporarily block hardware access in conferencing apps.
Platform-Specific Checks: Windows, macOS, iOS, Android
Windows users should verify privacy settings (as noted above) and ensure Teams is allowed in the firewall. macOS users should confirm that “Camera” is allowed under Privacy and that Screen Recording access isn’t blocking video apps. On iOS, ensure Teams has camera permissions enabled in Settings > Privacy > Camera, then retry within the app. On Android, check App permissions in Settings and confirm that Teams is allowed to access the camera. If you test on multiple platforms, you’ll quickly identify if the issue is isolated to one OS or device.
External Web Resources and Authority Sources
For deeper reference, consult official sources such as Microsoft’s Teams documentation and support pages. Helpful guidance can be found at these reputable sources: https://learn.microsoft.com/en-us/microsoft-teams/ and https://support.microsoft.com. These pages cover device settings, permissions, and best practices for Teams video and audio. If you need formal guidelines, you can also review broader privacy and security resources from recognized authorities and major publications.
Best Practices for Consistent Camera Performance in Teams
To maintain reliable video, ensure you have adequate lighting (front-facing light rather than backlight), a clean background, and avoid moving quickly in and out of frame. Use a high-resolution camera when possible, minimize background processes to free CPU/GPU resources, and keep Teams updated to minimize compatibility issues. Regularly check hardware connections and keep drivers current. Testing in a controlled environment before important calls can prevent embarrassing interruptions during live meetings.
Additional Resources and Next Steps
If you still encounter issues after following these steps, consider testing the camera on another device to determine whether the problem is hardware-related. Reach out to IT or device support if the issue persists across devices. For ongoing problems, document your steps and gather screenshots or screen captures to share with support teams for faster resolution. Remember: consistent testing reduces last-minute meeting disruptions.
Tools & Materials
- Device with camera (built-in or external)(Ensure the camera is physically connected and accessible)
- Stable internet connection(Prefer wired Ethernet or strong Wi‑Fi)
- Updated Microsoft Teams app(Use the latest desktop or mobile version)
- Operating system privacy settings access(Know how to adjust app permissions (Windows/macOS/iOS/Android))
- External webcam (optional)(Useful for testing higher-quality feeds)
- USB cable/adapter (if using external camera)(Have a spare cable on hand)
Steps
Estimated time: 15-25 minutes
- 1
Prepare hardware and close other apps
Ensure the camera is not in use by another app (close video pages and any other conferencing apps). If using an external webcam, disconnect and reconnect it to reinitialize the device.
Tip: Close all background video apps to prevent conflicts that block access to the camera. - 2
Open Teams and access device settings
Launch Teams, open Settings, then navigate to Devices. Confirm which camera is selected and that the preview shows a live image.
Tip: If you see a dropdown with multiple devices, test each camera to identify the one that works reliably. - 3
Verify OS privacy permissions
On Windows, macOS, iOS, and Android, ensure Teams has camera permissions and that no OS privacy setting blocks access to the camera.
Tip: A quick OS-level reboot after changing permissions can help apply the new settings. - 4
Run a test call or preview in Teams
Use the built-in camera preview or start a quick test call to validate video. Check for green indicators and stable framing.
Tip: If the preview is choppy, reduce resolution in Settings or close CPU-heavy apps. - 5
Update drivers and Teams
Update camera drivers (if external) and ensure Teams is up to date. Manufacturer software may also influence performance.
Tip: Restart after updates to ensure changes take effect. - 6
Try alternate ports or devices
If the camera isn’t detected, try a different USB port or another camera to determine if the issue is port-related or device-specific.
Tip: Avoid hubs for critical tests; connect directly to the computer when possible. - 7
Test on mobile if needed
If desktop testing fails, test the Teams mobile app (iOS or Android) to see if the issue is device-specific.
Tip: On mobile, grant camera permissions in OS settings and retry in Teams.
Common Questions
Why isn’t my camera showing in Teams?
The most common causes are permissions, the wrong camera selected, or OS settings blocking access. Start by checking Teams device settings, then verify OS privacy permissions and test with a quick call.
If your camera isn’t showing, first check Teams' device settings, then confirm OS permissions and try a quick test call.
How do I run a camera test in Teams?
Open Settings > Devices in Teams and pick the camera, then use the preview or make a test call to verify video is visible.
Open Teams settings, select the camera, and use a test call to verify video.
Can I use an external webcam with Teams?
Yes. Plug in the webcam, install any required drivers, and select it in Teams under Device settings.
Yes, you can use an external webcam by selecting it in Teams.
What should I do if Teams says the camera is in use by another app?
Close the other application using the camera, then retry in Teams. If needed, restart the device.
If Teams says the camera is in use, close other apps and try again.
Does camera testing differ on mobile?
The process is similar: grant camera permissions in OS settings, then select the camera in Teams settings.
On mobile, allow camera permissions and choose the camera in Teams.
Should I update camera drivers for Teams?
External cameras benefit from up-to-date drivers; keep your OS and Teams app updated for best results.
Update your camera drivers if you use an external device and keep your OS updated.
What if the issue persists after testing?
Test on another device to isolate hardware issues or contact IT/support with a summary of steps tried.
If it still fails, try another device or contact support with what you’ve done.
Watch Video
The Essentials
- Verify camera permissions before testing
- Use Teams device settings to select the correct camera
- Run a test call to confirm visibility and audio
- Update drivers and software to resolve Bugs
- Test across platforms to isolate issues