Should Camera Lenses Be Stored Upright? A Practical Guide
Explore whether storing camera lenses upright protects optics and seals. Learn best practices, gear, and a step-by-step approach for safe, long-term lens storage with humidity control and organized racks.

Storing camera lenses upright is a practical default for many photographers because gravity helps reduce stress on the glass and internal seals and minimizes the chance of cap contamination. It also promotes airflow around the lens, which aids moisture control. Always cap both ends, keep the storage area dry, and avoid heavy stacking. This upright approach pairs well with a stable environment and clearly labeled shelves.
Why upright storage is commonly recommended
According to Best Camera Tips, storing lenses upright is a practical default for many photographers because gravity helps reduce stress on the glass and internal seals and minimizes the chance of cap contamination. An upright orientation makes it easier to access the most frequently used lenses without bending or tugging on delicate parts. It also tends to promote airflow around the lens, which helps moisture evaporate and dust settle away from the front element when the enclosure is well-sealed. For home storage, combining upright orientation with a dust-free cabinet and labeled shelves makes daily organization simpler and lowers the risk of accidental pressure on the lens mount during handling. In the long run, a stable vertical setup supports consistent performance and reduces the chance of mold and fungus in humidity-prone environments. The key is to use proper caps, padding, and humidity control so the upright stance remains safe and reliable.
How gravity and airflow affect lens storage
Gravity does not just pull objects downward; it also guides how forces are borne by the lens housing and seals. When lenses stand upright, the rear mount and seal area bear vertical load more predictably than if a lens were laid flat and pressure points shifted toward the glass. Connected to this, a properly sealed cabinet allows air to circulate slowly around stored lenses. That airflow helps prevent stale air pockets where moisture can condense and micro-dust can settle on elements. To maximize these benefits, ensure the cabinet has consistent airflow and avoid overcrowding that blocks vents or traps warm air. A simple, clean system with labeled sections makes it easier to maintain the correct orientation and check for signs of moisture or dust.
Types of lenses: vertical storage considerations
Not all lenses are identical, and certain shapes can influence how you store them upright. Slim primes fit easily into vertical slots with minimal contact, while longer zooms and telephoto lenses may need more substantial padding or a cradle to prevent tipping. Wide converters and macro lenses, with their exposed glass and filters, benefit from supportive dividers that prevent knocking or surface contact. For vintage lenses with fragile coatings, consider extra protection and shorter storage cycles to reduce exposure risk. Regardless of type, keep front and rear caps in place when stored upright, and avoid stacking two large lenses directly on top of one another where pressure could transfer to the glass.
How to choose a vertical storage solution
Selecting a vertical storage solution starts with your space, climate, and lens collection size. Look for a cabinet or rack with adjustable shelves and soft padding to cushion each lens. Anti-tip features are helpful if you’re stacking multiple lenses on a shelf. A shallow, vertical cubby system allows you to slide lenses in and out without moving others. If space is tight, consider a compact gravity-fed rack that minimizes contact with lenses while allowing quick access. Label each slot by focal length, priority, or usage, so you can grab the lens you need without disturbing the rest of the collection.
Organizing a multi-lens rack efficiently
With a growing collection, organization becomes essential. Group lenses by type (prime, zoom, macro), by brand, or by the camera system they belong to. Store frequently used lenses in front rows and seasonal or rarely used pieces in back rows. Use soft dividers and padding to prevent scratches and keep lids aligned. Maintain a digital inventory or a printable checklist so you can track which lenses are currently stored upright, when they were checked, and when a hub like silica gel needs replacement. Regularly rotate stock to avoid dust settling into similar areas and to catch any signs of moisture before mold forms.
Cleanliness, caps, and humidity control
Dust-free storage starts with clean lenses and clean storage space. Wipe each lens with a microfiber cloth before storing, especially if it has moisture exposure. Keep both front and rear caps on, and ensure the caps are not warped or loose. Humidity control is essential; place silica gel packs or a dedicated desiccant system inside the cabinet to maintain a consistently dry microclimate. Check the desiccants every few weeks and replace or recharge as needed. A dry, stable environment reduces decay of gaskets and seals, preserving autofocus motors and zoom components for longer.
Storage containers and materials that help longevity
The container you choose matters as much as orientation. Use rigid, non-reactive cases with padded interiors to minimize movement. Soft, lint-free dividers prevent glass-to-plastic contact, while microfiber or lens-specific pouches add a final layer of protection. Avoid corrugated cardboard boxes and direct sunlight; store away from heat sources such as radiators or electronics that generate warm air. If possible, keep lenses in a dedicated climate-controlled cabinet with a lockable door to deter dust and tampering. Regular inspection of storage materials is key to catching wear before it becomes costly.
Safety and safety warnings for storage setups
Even a seemingly simple storage solution can pose hazards if misused. Do not jam lenses into narrow slots; pressure from tight packing can crack front elements over time. Avoid placing heavy items on top of storage units—heavy lenses can topple or deform shelves. Keep liquids away from the cabinet to prevent any liquid damage in case of leaks. Use stable stands and test the setup for wobble. If you notice any mold, unusual moisture, or temperature fluctuations, reassess the storage environment immediately and consult a professional if needed.
Troubleshooting: when upright storage might not be ideal
In some spaces, upright storage may be impractical due to limited height clearance or unusually humid air. If you cannot maintain a dry microclimate or have a high risk of tipping, consider a horizontal storage approach with proper supports and strict weight distribution. For a hybrid solution, rotate lenses into upright positions for frequent use while keeping seasonal gear in secure, padded crates that lie flat. The goal is to minimize impact on optics and mechanical seals, not to force an orientation that creates risk.
Tools & Materials
- Front lens caps(Keep in place when stored upright to prevent dust entry.)
- Rear lens caps(Secure the rear mount end during storage.)
- Vertical lens rack or dividers(Soft padding and anti-tip design recommended.)
- Humidity control (silica gel packs or a desiccant cabinet)(Replace or recharge desiccants regularly.)
- Microfiber cleaning cloth(Use for quick wipe-downs before storage.)
- Soft storage bags or pouches(Optional for extra protection on fragile lenses.)
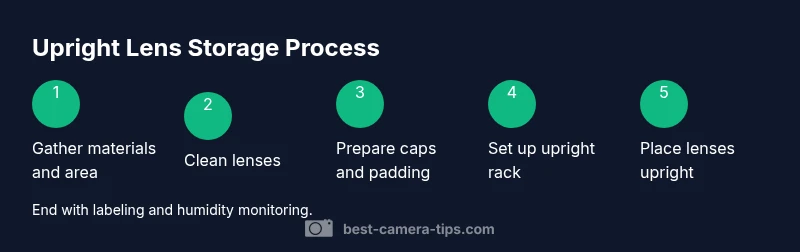
Steps
Estimated time: 30-60 minutes
- 1
Gather materials
Collect all caps, the vertical rack, padding, desiccants, and cleaning supplies. Clear a dry, dust-free area for the storage setup. Confirm you have labeled slots or shelves to separate lens types.
Tip: Have everything within arm’s reach to keep the process smooth. - 2
Clean lenses and inspect
Wipe each lens surface with a microfiber cloth. Check for cracks, haze, or sticky seals around the mount. Address any issues before placing the lens in storage to prevent further damage.
Tip: Dirty optics can transfer dust to the storage area. - 3
Prepare caps and protection
Ensure both front and rear caps are clean and fit snugly. If the lens has a weather sealing ring, confirm it sits properly to maintain a dry interior.
Tip: Cap integrity matters more in long-term storage. - 4
Set up upright rack
Position the vertical rack on a stable surface away from heat or sunlight. Adjust shelves or slots to accommodate different lens sizes without crowding.
Tip: Allow space for airflow and easy access. - 5
Place each lens upright
Place each lens on its rear cap with the optical axis vertical. Use padding to cradle the lens and prevent contact with the front element or glass surface.
Tip: Never stack lenses directly on top of one another. - 6
Label, inventory, and monitor
Label each slot with the lens model and usage frequency. Keep a quick inventory sheet and schedule periodic humidity checks.
Tip: Regular checks catch humidity changes early.
Common Questions
Should lenses always be stored upright?
In most cases, upright storage helps minimize stress on the glass and seals while allowing air circulation. It’s especially beneficial when combined with clean caps, a dry cabinet, and proper organization.
Yes—storing lenses upright is generally best for protection, provided you cap them and control humidity.
Is upright storage better for all lens types?
Upright storage works well for most lenses, but some heavy telephotos or extremely long zooms may need extra support to prevent tipping. Always adapt the rack to fit the lens dimensions.
Mostly yes, but be sure to support bigger lenses properly to prevent tipping.
Can upright storage cause condensation?
Condensation occurs when warm, humid air contacts cool optics. Upright storage helps with airflow, but you must control humidity with desiccants and avoid storing in damp areas.
Humidity control is key; upright orientation won’t prevent condensation by itself.
What about lens hoods or filters in storage?
Keep hoods on the lenses to avoid contact with dust. If a hood is bulky, remove it and store separately with the lens caps in place to maintain protection.
Caps on, hoods either attached or stored separately with the lens secure.
How often should I check humidity levels?
Check humidity levels regularly, at least monthly in changing seasons. Replace desiccants when they begin to feel damp or show reduced effectiveness.
Check humidity regularly and replace desiccants as needed.
If I don’t have a vertical rack, what are alternatives?
Use a padded horizontal case with individual compartments and ensure each lens is protected by caps. Keep the case in a dry area and away from heat sources.
If you lack vertical storage, a padded, labeled horizontal case works well.
Watch Video
The Essentials
- Store lenses upright for easier access and gentler weight distribution.
- Cap both ends and maintain a dry environment to prevent mold.
- Label shelves and rotate lenses to avoid long-term stagnation.
- Use soft dividers and padding to prevent scratches and impact.