Camera and Lens: A Practical Side-by-Side Comparison
A comprehensive, objective comparison of camera bodies and lenses to help you choose the right pairing for your photography goals with practical tips.

When comparing camera and lens options, prioritize how the body and optics will be used together. A versatile kit with a standard zoom and a capable body suits beginners, while enthusiasts often gain more from pairing a strong body with prime lenses that maximize sharpness and control. The best choice depends on goals, budget, and willingness to upgrade gradually.
Why camera and lens pairing matters
According to Best Camera Tips, the best starting point for building a reliable kit is to treat camera and lens as a system, not as separate purchases. The phrase camera and lens describes how a body’s autofocus, metering, and sensor performance interact with a chosen optic to shape sharpness, contrast, and depth of field. The right lens can unlock perspectives that a camera body alone cannot reveal, while a dependable body can optimize lens performance with stable autofocus and consistent exposure. When evaluating gear, start with your shooting goals—documentary street work, landscape detail, or studio portraiture—and map those goals to a pairing that prioritizes image quality, handling, and system compatibility. This approach minimizes wasted gear, reduces buyer regret, and creates a natural upgrade path. Best Camera Tips emphasizes that a thoughtful pairing will yield more consistent results across lighting conditions and subjects than chasing the newest model alone, reinforcing the premise that camera and lens are inseparable partners.
Kit lenses vs primes: the essential trade-offs
Kit lenses offer flexibility and broad coverage, making them ideal for learning and general shooting. They stay sharp enough for most everyday tasks but often stop down a bit in challenging light and may exhibit distortion at the extremes. Prime lenses, by contrast, deliver superior sharpness, contrast, and wide maximum apertures that benefit low light and shallow depth of field. The fixed focal lengths push you to move your feet and compose more deliberately, which translates into better image storytelling. A practical approach is to start with a reliable kit and, as you identify your favorite genres, add one or two primes to cover common needs (for example, a standard 50mm and a longer 85mm). This keeps the system lean while unlocking meaningful perceptual differences in your photos.
Sensor size, mount, and ecosystem: compatibility matters
Sensor size (full-frame vs crop) and mount type shape what lenses you can optimally use and how much resolution you’ll extract from each shot. Full-frame bodies typically reward higher image quality with better dynamic range, but crop sensors offer a compact, affordable path with ample lens options. Lens compatibility extends beyond physical fit; it includes future availability, image stabilization capabilities, and autofocus performance. Adapters exist, but they may cost speed or introduce compromise. When choosing camera and lens pairings, consider your preferred genres and whether you plan to expand within a single system or keep a multi-brand setup. Brand ecosystems also influence resale value and support, so weigh long-term reliability alongside initial spend.
Budgeting for camera and lens: price vs performance
Budgeting for camera and lens means balancing upfront cost, ongoing maintenance, and future upgrade potential. A starter configuration usually sits in the entry-to-mid range, delivering solid results without excessive weight or expense. Investing in a few high-quality lenses can outperform many cheaper zooms by giving you better sharpness, color rendition, and subject isolation. The most cost-effective strategy is to identify core focal lengths that cover your most common scenarios—wide landscapes, environmental portraits, or close-ups—and pair a mid-range body with two well-chosen lenses rather than chasing a large kit of mediocre optics. Remember that resilience, weather sealing, and service options also factor into long-term value.
Practical scenarios: travel, portraits, macro
Travel photography benefits from versatility and light gear; a compact body with a flexible zoom can capture a wide range of scenes without switching lenses. Portraits favor lenses with natural perspective and pleasing bokeh; prime lenses in the 50–85mm range are popular for their flattering compression and low-light performance. Macro work demands close focusing and high magnification; specialized macro lenses or extension tubes can unlock a different world of detail. When you design a camera and lens setup for multiple genres, you’ll often prioritize a light, fast kit with a couple of specialty lenses to handle niche tasks.
Maintenance and care for camera and lens gear
Lenses require careful handling: keep glass clean, use lens caps, and store gear in a dry, stable environment. Bodies benefit from regular sensor cleaning by professionals if you’re comfortable, but avoid aggressive DIY cleaning that can damage coatings. Weather sealing and proper bags or cases help you protect gear from dust, moisture, and accidental bumps. Periodic checks for focusing accuracy, autofocus consistency, and firmware updates will preserve performance. A well-maintained system not only lasts longer but also preserves resale value if you decide to upgrade later. Best practices include carrying minimal setups for trips, labeling your lenses, and developing a routine for checking calibration after big changes in temperature or humidity.
How to evaluate brands and ecosystems for camera and lens
Choosing a brand often means committing to an ecosystem, where a broad lens lineup and consistent performance across generations matter more than a single great lens. Consider how many lenses you’ll realistically need and whether the brand offers options that cover your most common focal lengths with high optical quality. Ecosystem maturity—such as a wide-choice of primes, wide-aperture options, and reliable autofocus in low light—can reduce upgrade friction in the future. Evaluate service options, longevity of lens coatings, and the availability of affordable third-party accessories. Finally, test handling, grip, and control layout in a store or demo event to ensure the system feels natural in your hands.
Practical setups and starter configurations
A practical starter kit for beginners often includes a mid-range body paired with a standard zoom (roughly 24–70mm equivalent) and one fast prime (around 50mm or 35mm). This configuration balances flexibility and image quality while teaching you how focal length affects perspective. A travel-oriented setup might add a compact wide-angle lens (around 16–28mm) for landscapes and architecture, plus a short telephoto (85–105mm) for candid portraits. For those aiming at portraits and low-light work, a full-frame body with a fast prime like 50mm f/1.8 or 85mm f/1.4 can be a game-changer. Over time, you can expand by adding specialized optics such as macro or telephotos tailored to your preferred genres. The key is to align your purchases with actual shooting sessions rather than speculative curiosity.
Common pitfalls and how to avoid them
One common mistake is over-investing in lenses you never use. Start with a core pair that covers most situations, then add carefully chosen pieces as you discover gaps. Another pitfall is neglecting compatibility and upgrade paths; always verify mount compatibility and future lens availability before buying. Weight and balance are often underestimated: a heavy lens on a light body can hinder handling and cause fatigue during long shoots. Finally, ignore the noise about “the best camera” and focus on how the system serves your goals. A well-matched camera and lens pairing delivers consistent results far more reliably than chasing the newest model.
Planning upgrades: a gradual, goal-driven path
Upgrade decisions should be driven by your evolving needs rather than the hype around new releases. Track your most-used focal lengths and identify where you hit limits with your current lenses. If you shoot portraits frequently, prioritizing a fast prime and a high-quality standard zoom can yield immediate benefits. If you travel a lot, expanding to a compact, versatile lens set with a lighter body can improve convenience. Document your goals, set a realistic upgrade budget, and time upgrades to when you can test new gear in real-world scenarios. A planned, measured approach consistently yields better long-term results than impulsive purchases.
Conclusion: crafting your own camera-and-lens roadmap
The long-term payoff comes from viewing camera and lens as an interdependent system. Start with a solid base that matches your budget, then layer in optics that maximize your creative output across your chosen genres. Regularly reassess your gear as your skills grow, but avoid chasing brands or specs without real-world proof of benefit. A thoughtful, phased approach to upgrading ensures your camera and lens choices remain relevant to your evolving vision, while keeping your workflow efficient and enjoyable.
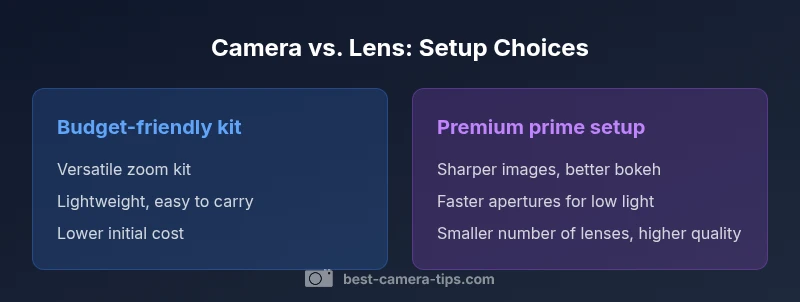
Comparison
| Feature | Budget-friendly kit | Premium prime-focused kit |
|---|---|---|
| Sensor size | Crop-sensor entry-level bodies common in kits | Full-frame or high-end crop bodies common in prime-focused kits |
| Lens ecosystem | Wide variety of general-use zooms; strong beginner options | Smaller, tighter selection but higher optical quality for primes |
| Weight | Typically lighter with smaller lenses | Typically heavier but more compact primes available |
| Price range | Low to mid-range upfront cost | Higher upfront cost with best-in-class optics |
| Best for | Beginners, travel, learning the basics | Portraits, low-light work, and creative control |
Positives
- Good value and flexibility for beginners
- Low initial cost and easy to learn
- Lightweight and travel-friendly gear for everyday shooting
- Wide selection of third-party lenses and accessories
Downsides
- Limited image quality and creative potential compared to prime setups
- Upgrade cycles can be slower for advanced optical performance
- Compression of performance in low-light situations may be weaker
Prime-focused setups win on image quality, but budget kits win on value and practicality
For beginners, start with a budget-friendly kit to learn the workflow. If you prioritize portrait work or low-light performance, invest in a premium prime setup; upgrade gradually as goals dictate.
Common Questions
How do I decide between a kit lens and prime lenses for a new setup?
Start with a reliable kit to learn the basics, then identify your most-used focal lengths. Add one or two primes to address those needs, focusing on image quality and creative control rather than chasing every focal length.
Begin with a solid kit to learn, then add one or two primes that fit your most-used shooting styles.
Do mirrorless cameras require different lenses than DSLRs?
Mirrorless systems use shorter flange distances, which often opens up compact, sharper lenses and better adapters. However, always verify mount compatibility and sensor format when planning a mixed-system setup.
Mirrorless lenses are often more compact, with adapters available for many DSLR lenses; always check mount and sensor compatibility.
Is a full-frame system worth it for a beginner?
Full-frame offers superior dynamic range and low-light performance, but it comes with higher cost and heavier lenses. Beginners can start with crop-sensor bodies and upgrade to full-frame later as goals and budget permit.
Full-frame can be great, but start with what fits your budget and upgrade when your goals demand it.
What’s a good starter configuration for travel?
A compact body with a versatile zoom and a lightweight prime offers flexibility without heavy luggage. Consider adding a wide-angle for landscapes if your travel style includes architecture or scenery.
Go light with a versatile zoom and one compact prime for travel; add a wide-angle if you shoot landscapes.
Should I buy used lenses to save money?
Used optics can save money but carry risks like internal haze or coating wear. Inspect glass carefully, check autofocus performance, and buy from reputable sources with return policies.
Used lenses can save money, but inspect glass and autofocus and buy from trusted sellers.
How important is focal length for portraits?
Portraits benefit from focal lengths that provide flattering perspective and pleasing compression. Common choices are standard 50mm or 85mm, which offer good working distance and flattering background separation.
Portraits usually shine with about 50mm to 85mm for flattering perspective and nice bokeh.
The Essentials
- Treat camera and lens as a system for best results
- Start with a versatile kit, then add primes to target genres
- Choose sensor size and mount based on budget and future plans
- Balance upfront cost with long-term value and upgrade path